Some species have natural chemicals within them that prevent germination of the seeds. They are designed like that because in a particular environment just falling to the ground and sprouting immediately would mean death and extinction of the species. By delaying germination and not sprouting today, they increase their chance of survival tomorrow.
This is generally to make sure they all come up when they notice certain specific environmental conditions.
This can also happen on a staggered basis with one coming up every now and then over a very long time, each one hoping to come up at exactly the right time. If it comes up at the wrong time then it is only a loss of a plant or two, not the whole generation of seeds.
Acacia are a great example of both so if you want more information on why some plants do this please see the Hot water treatment of Acacia species link.
I assume you have a good understanding of the why, so I will now move on to the how.
Some species require a chemical to be broken down and removed, some species require a new chemical to be created, and for more detail on the mechanisms and actions happening within the seeds, I have a pretty good explanation at the Halopriming for enhanced germination and drought resistance link.
Cool, so now you have a clear understanding of why a plant does it, and what happens inside the seed to make it happen.
In all cases no matter what the reason is, step one is to let stuff into the seed.
Without giving the seed access to water and chemicals in the soil then bugger all happens and this is true for every single species of plant on the planet. There are many ways to do it and all work to varying degrees.
PLEASE NOTE!
Scarification basically means “to damage”, and by causing damage you are increasing the chance of a seed dying, either by physically destroying the shoot or root, or by allowing infection by viruses, bacteria and fungi. This is unavoidable and it happens exactly the same in the wild too.
You are lowering the germination percentage meaning LESS seeds will sprout, and more seeds will DIE.
You are also greatly shortening the germination TIME, meaning they will all hurry up and germinate now or soonish, instead of months, years or decades later, like they were designed to do by mother nature. For some species, it totally isn’t worth doing.
On the other hand for some species, it just doesn’t make sense to wait.
For example, by scarification of your seed, you may only get 40% germination within a month.
The other 60% actually died from the process which doesn’t sound great at all…
Without scarification, you may get 90% germination or even higher which sounds really impressive.
It is very important to note that this impressive 90% germination may also take 10years or more for every seed to shoot which is a hell of a lot more time than most folks are willing to invest.
4/10 right now, or 9/10 in ten years time…
Scarification of suitable species means you can have plants fully growing to maturity and setting millions of seeds themselves, in exactly the same amount of time it takes an unscarified packet of seeds just to germinate.
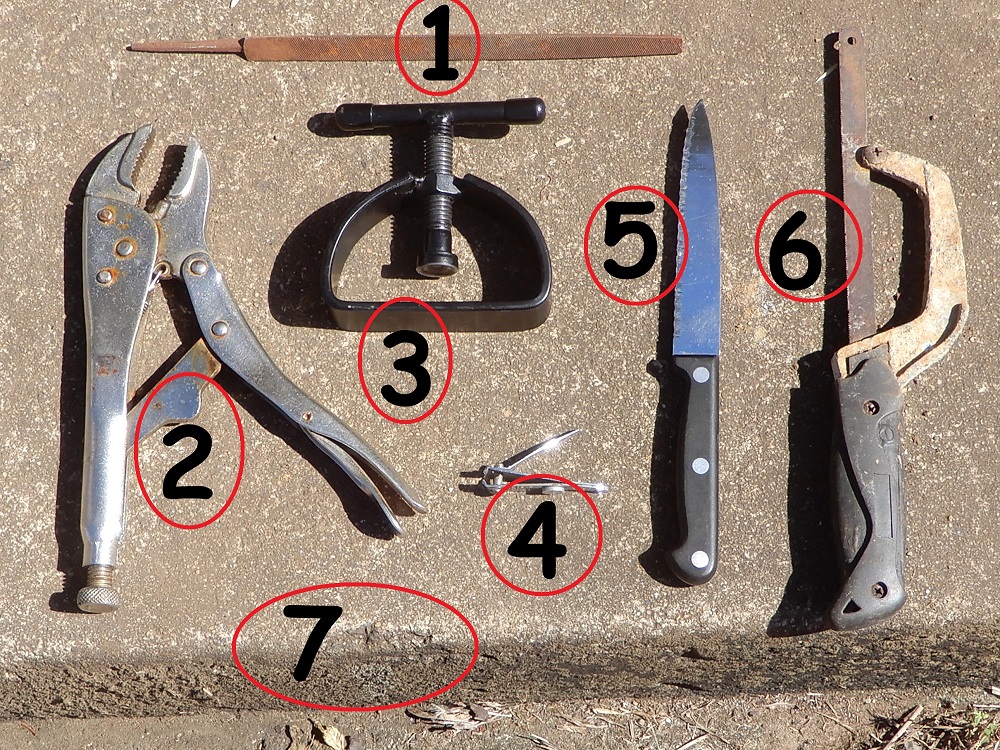
Scarification tools
- Triangular steel file.
Ideal for heaps of different species especially medium to large beans, lotus seeds, things easy to hold. - Multi-grips.
These are great for nuts and brittle seeds so that you can apply very slowly increasing amounts of pressure with each new pinch. They are also awesome for just holding a seed in place while you use another scarification tool to do the work. Makes using a steak knife a lot safer and also prevents you from filing off your fingertips on the concrete for example. - Bonk style nut cracker.
I’m a big fan of these and they really make scarification using pressure easier. The sensitive gradual tightening makes cracking things like stone fruit seeds a lot easier than any other method. As soon as there is any fracture or jump in tension then stop tightening.
It is best to under-crack, than to over-crack and crush the delicate kernel inside. - Nail clippers.
The small snipping corners are ideal for chipping Canna species seeds. Because the “eye” of a canna seed is near impossible to see there will be a few losses, but it speeds up germination by many months so for me I always use them. Unlike other high friction tools, there is no heat which increases the chances of success with some species. - Serrated steak knife.
A real favourite of mine as you can be really gradual with your cuts. The downside is I get impatient and pretty much always end up slicing my finger tips if I’m doing a big batch of seeds…
Don’t be a moron like me, use the multi-grips to hold the seed before you start sawing at it, or even better just use something safer… - Hacksaw.
This is a safer alternative to the steak knife, but it’s also a little slower.
It can still definitely give you a decent slice if you don’t be careful. With seeds like Entada and Mucuna species that pinch and grab a steak knife blade, jamming it in the shell, this fella makes a better choice. It has a wider squarer edged cut so less jamming, but it also creates more heat which can be good or bad. - Concrete steps, footpath or gutter!
This is what I use most of all and it can be found for free everywhere in the world.
The square corner cuts a nice V shape, the flat surface makes a nice gradual circle on rounded seeds. Just rub a single area of the seed back and forth slowly, being careful not to damage the eye. All the dust blows away preventing a mess, and unlike the other tools, they come with a view of the outside world along with a built in seat! I find it very relaxing just sitting there scarifying a bowl of seeds, watching the world go by.
Scarification rules.
Do NOT damage the eye!
The eye is the lump, ball, joined bit and that is where the shoot and root are hiding. If you damage the seed kernel meat it is normally salvageable, but if you damage the root or shoot before it has emerged then your seed is 100% dead. Plant it anyway, but yeah, expect that one to rot.
All you do is apply pressure, cut or abrade the seed very slowly, stopping very often cuts to inspect it. You will gradually see the cut area of the seed shell changing colours. It generally starts black, then it goes brown, tan and then finally white.
White means you have cut too deep and damaged the kernel. Every seed is different and it takes practice to get good at it.
You WILL kill a couple, the same way fire, flood, insects, wild, weather, erosion all kill a couple in nature too.
This is a design feature of the species with the goal of the plant not being for every single seed to grow. Its goal is just survival of the species via eventual reproduction. As long as some survive the small amount of death means nothing except a minor short term increase in food to the surrounding soil and the organisms that live there.
Once scarified just plant them into a nice soil mix and cross your fingers. You’ve done your best and now it’s all up to nature and with properly scarified seeds germination should be fast, often within a week or two.
If nothing has happened in two or three months time there are really only two possibilities.
- The seeds are still sitting dormant as they were not scarified enough.
The water in the soil has not penetrated and started a chemical reaction within the seeds yet. In that case, dig them up and physically inspect them.
If they look intact and firm still then scarifying them again may be all they need. I generally cut one way the first time, then I cut across the other way to make an X the second time. This second scarification does not need to be very deep as there is already a lot of weakness created from that first cut. - The second possibility is that the seeds are dead.
In my experience, these are the most common causes of death.
- The cut let water penetrate but then it pooled in the cup-shaped seed coat causing anaerobic bacteria and fungal attack(damping off).
- The cut let water penetrate and the shoot kicked off perfectly, but unfortunately, it was attacked by bacteria and fungi and died from damping off, very often before making it’s way to the soil’s surface. Poor drainage and not enough air spaces from a mix lacking in sand is often the reason.
- The cut was perfect and water penetrated perfectly but unfortunately so did excessive nitrogen which killed the seeds. It could be the soil is too acidic or rich and this is SUPER common for fancy soil mixes that have colourful slow-release fertiliser balls. I talk in depth about that on my Soil Mix page.
- The seed was cut deep enough to trigger germination, but the seed coat wasn’t cut enough for it to split open actually releasing the seedling. Instead, the shoot and/or root was strangled, choked, damaged, and shortly after it rotted and died.
- The soil was too dense or heavy or rocky, or a small piece of wood chip prevented expansion and movement as the seed swelled. Instead, the shoot and/or root was strangled, damaged, and shortly after it rotted and died.
- There was perfect seed penetration by water but the secondary trigger prevented successful germination. This needed trigger can be leaching out of chemicals in the seeds as happens with flooding wet season rains.
- It could be that the soil was lacking chemicals in the soil. Things like KAR which is accumulated soon after a bushfire and I talk about that in more detail on my Smoke treatment page.
- It could be the cut was a bit too deep, or the cutting process made too much friction heat, physically killing the seed.
- It could be that the current climate was too hot, cold, wet, dry or humid.
- It could be that wasn’t hot, cold, wet, dry or humid enough.
- It could be that the plant needs a change in conditions, like a period of cold, then heat, or a period of dry them wet, or even visa versa.
- It could even be critters and insects like ants destroyed the nutritious seed underground, or just dug it up from the surface during the heat of the day and carted it off to the nest. A similar thing happens with nematodes, and beetle larvae like lawn grubs except they hollow out the seed while still underground.
- Cut worms and army worms are a very very common caterpillar that hides in the soil during the day emerging at night. They are camo brown and very good at hiding, and they eat seedlings off right down to ground level overnight. The next day you get up and just seed an empty pot, just like you saw yesterday, whereas at 11pm-2am you may have had 100% successful germination.
Unfortunately they were all eaten during the night so to your eye it looks like the seeds were duds. I reckon this is the vast majority of what has happened to folks that repeatedly have failures.
If you scratch around in the soils top 2cm, then blast it with a garden hose you will find the little buggers curled up hiding. Blast and overfill the pot with water and as the soil soaks back down look very closely for rings and circles. That’s them and if you find one you will have dozens hiding nearby! I bloody hate them, but luckily the chooks eat them so don’t go to waste. - Field mice and rats and possums will destroy seedlings and remove seeds without leaving much evidence behind and in suburbia, they are super common. I encourage the snakes and predatory birds for me they are much less of an issue.
- Bloody cane toads love moist soil and they lay on top of seedling trays and climb up into pots and raised beds at night to soak up moisture like a sponge. They cause a heap of damage and sometimes they leave no evidence at all. At other times the soil surface looks normal but if you scratch around the surface with your fingers you will find the bastards have dug down destroying your seedlings and are hiding completely hidden underneath.
- I have also seen finches, top notch and domestic pigeons, magpies and a couple other birds I can’t think of at the moment dig up seeds and seedlings leaving very little trace behind.
No matter the cause of failure, waiting a reasonable amount of time then digging them up and physically inspecting the seeds is a great way to help work out what the cause of your failure was.
Be very careful though as dozens of times I have tried to do this only to snap the delicate shoot off that was already making it’s way to the surface. I have never done it to something cheap or common, but with rare uncommon stuff, it’s really hard to be patient. Many times my stooopid impatience has been the actual eventual cause of failure.
That’s about it I guess? Scarification, in some cases it’s a great option!